Inventory
>
Building items
> Auto-building items
New Features
Advanced Filters for Registers
Void Cheque
Mileage Tracking
Departments added to Bank Deposits
Improved bank statement import
Tracking Leads
Hide Inactive
Update AccountEdge date
Departmental Accounting
Retainers, Escrows and Trusts
Document Manager
Change Orders
Expanded tax code field
Add notes to a sale and a purchase transaction
Easier navigation for invoices and bills
Purge Sale/Purchase Quotes and Cards
Tracking Commissions
Easier navigation for invoices and bills
Create a copy of transaction
Purge Sale/Purchase Quotes and Cards
Combine Items
Departments added to Inventory Adjustments
Track Serial Numbers
Track Warranties
Migration Assistant
7 Years Historical reporting
Profit Analysis reports
Lead reports
Department reports
Mileage Tracking reports
Manage AccountEdge Cloud
Web Store Integration Enhanced
Introduction
Learning about your AccountEdge software
Manuals
Online help
Other resources
Where to start
Experiment with sample data
Explore your AccountEdge software
Command centres
Sidebar
Calendar (date entry)
Business calendar
Calculator
Zoom arrows
Search icons
Select columns
Mouse shortcuts
Shortcut keys
Setting up your company file
Overview
Create a company file
Easy setup assistant
Activate the company file
Set up accounts
Setting up accounts
Enter account opening balances
Set up preferences
Set a password for the Administrator user ID
Advanced setup
Overview
Set up sales
Set up purchases
Do an initial bank reconciliation
Task 1: Identify uncleared withdrawals and deposits
Task 2: Record uncleared withdrawals and deposits
Task 3: Reconcile
Create item records
Enter inventory opening balances
Set up a Web Store
Web Store Gift Cards
Web Store Sync items
Manage Mobile Application
Banking
Receiving money
Bank deposits
Spending money
Entering transactions in the Bank Register window
Transferring money between accounts
Tracking petty cash expenses
Reconciling your bank accounts
Undoing an account reconciliation
Importing statements
Recording miscellaneous transactions
Void Cheques
Credit card transactions
Analysing your cash flow
Sales
Creating a lead card
Creating a customer card
Entering sales
Task 1: Enter information about the customer
Task 2: Choose the type of sale
Task 3: Enter the items or services you are selling
Task 4: Enter additional information about the sale
Task 5: Complete the sale
Adding and deleting transaction lines, headers and subtotals
Recording sales with insufficient on-hand item quantities
Build, buy or backorder items
Allow negative on-hand item quantities
Changing the status of a sale
Track a change order
Reviewing your sales information
Receiving payments
Printing payment receipts
Credit control
Credit limits
Credit holds
Finance charges paid by customers
Customer credits
Settling credits
Dealing with a supplier who is also a customer
Accounting for bad debts
Progress Billing
Manage Retainers, Escrows & Trusts
Process Web Orders
Commission Tracking
Purchases
Creating a supplier card
Entering purchases
Entering a purchase transaction
Task 1: Enter information about the supplier
Task 2: Choose the type of purchase
Task 3: Enter the items or services you are purchasing
Task 4: Enter additional information about the purchase
Task 5: Complete the purchase
Adding and deleting lines, subtotals and headers to purchases
Receiving items without a supplier bill
Set up an accrual account for items received without a supplier bill
Recording items received without a supplier bill
Creating a purchase order from a sale
Changing the status of a purchase
Reviewing your purchases information
Paying bills
Recording and settling supplier debits
Settling supplier debits
Adding finance charges paid to suppliers
Billing for time
About the time billing feature
Setting time billing preferences
Setting billing rates
Creating activities
Creating activity slips
Creating multiple activity slips
Changing and reviewing activity slips
Creating time billing invoices
Work in progress
Billing Rate Levels
Inventory
Creating items
Average Cost, Last Cost and Standard Cost
Creating item variations
Making inventory adjustments
Examples of inventory adjustments
Inventory locations
Recording inventory movements between locations
Building items
Auto-building items
Performing stocktakes
Reviewing your inventory information
Setting item prices
Customising inventory
Creating custom price levels
Creating custom lists
Custom lists and inventory reports
Creating brands list
Brands list and inventory reports
Weight
Creating custom fields
Creating tags list
Web Store Item Sync
Track Serial Numbers
Track Warranties
Lists
Adding a record
Adding records using Easy-Add
Setting up Tax codes
Finding a record
Changing a record
Inactivating or reactivating a record
Deleting a record
Combining records
Combining cards
Combining accounts
Combining items
Tracking Mileage
Company vehicles list
Mileage Rates
Mileage Slips
Document Manager
Transactions
Finding a transaction
Changing or deleting a transaction
Changing a transaction
Deleting a transaction
Reversing a transaction
Recurring transactions
Setting up recurring transactions
Recording recurring transactions
Reminders
Create copy of a transaction
Publishing to iCal
Publishing an invoice or purchase to iCal
Publishing a recurring transaction to iCal
Publishing a reminder log entry to iCal
International transactions
About the multiple-currency feature
Setting up multiple currencies
Task 1: Select the multiple currency preference
Task 2: Set up records for foreign currency
Task 3: Create accounts to track foreign-currency transactions
Task 4: Assign accounts to foreign currencies
Task 5: Assign currencies to foreign customers and suppliers
Exchange rates
Tracking currency gains and losses
Tracking realised currency gains and losses
Unrealised currency gains and losses
Miscellaneous transactions
Transferring funds to a foreign account
Entering foreign-currency transactions in a local account
Reconciling accounts containing foreign transactions
Reports
Producing reports
Printing report batches
Customising reports
Task 1: Select the data to be printed
Task 2: Select the required fields
Task 3: Select finishing options
Task 4: Change the report format
Task 5: Print the report
Task 6: Save the report
Changing the default fonts on reports
Forms
Finding forms
Sending forms
Sending forms when you record a transaction
Sending forms in a batch
Advanced filters
Customising forms
Task 1: Display the form
Task 2: Set up form properties
Task 3: Adding and editing elements
Task 4: Preview the customised form
Task 5: Save the customised form
Task 6: Print the customised form
Changing the default fonts on forms
Adding and editing elements
Adding and editing data and label elements
Adding and editing graphic elements
Editing all elements with common commands
Contact management
Creating a card
Keeping in touch with your contacts
Personalised letters
Mailing labels
Reminder log
Other ways to keep in touch
Grouping your contacts
Identifiers
Custom lists
Synchronising AccountEdge cards with Mac Address Book cards
Deleting cards
Resetting the synchronisation
Customising cards
Card identification codes
Card pictures
Lead Source and Status
Reviewing your contact information
Financial control
Tracking financial information
Accounts
Categories
Jobs
Departments
Reimbursable expenses
Step 1: Set up a job
Step 2: Assign expenses to the job
Step 3: Bill the customer
Changing the status of a reimbursable expense
Budgets
Entering budget amounts
Budget Shortcuts window
Reviewing financial information
Auditing your records
Company Data Auditor
Audit trail tracking system
End-of-period procedures
Month-end procedures
Task 1: Run the Company Data Auditor
Task 2: Reconcile bank accounts
Task 3: Review reports
Task 4: Send customer statements
Task 5: Record depreciation
Task 6: Prepare your GST return
Task 7: Lock periods
Starting a new financial year
Task 1: Complete month-end tasks
Task 2: Perform a stocktake
Task 3: Provide information to your accountant
Task 4: Enter end-of-year adjustments
Task 5: Back up your company file
Task 6: Start a new financial year
Task 7: Optimise and verify your company file
Managing user accounts and company files
Managing user accounts
Backing up and restoring company files
TConfirming activated company files
Troubleshooting activated company files
Servicing your company file
Checking your company file for errors
Optimizing your company file
Purging information that is no longer needed
Troubleshooting file-locking problems
Changing company file date
Special considerations for networked company files
Preventing data entry while generating reports
Storing custom reports and forms on a network
Displaying up-to-date information
Improving performance
Alert messages—company file
Alert messages—transactions
Appendix A: Importing and exporting data
Exporting data
Importing data
Importing from MYOB RetailManager
Importing an accounts list from Accountants Office
Managing import and export records
AppleScripts
Appendix B: Networking company files
Preparing company files for multiple users
Setting up the network hardware
Setting up a company-file folder on a Mac OS X host
Accessing the shared company file from Mac OS X workstations
Glossary
Index
Auto-building items
For items that you repeatedly build, you can use the Auto‑Build function to build the finished items.
Before you can build a finished item using the Auto-Build function, you need to define what items are needed to build the item.
tip :
Auto-build from the To Do List
You can also auto-build items using the
To Do List
. In the
Stock
view of the
To Do List
, select the items you want to build and click
Order/Build
.
To define an Auto-Build
item
1
Go to the
Inventory
command centre and click
Items List
. The
Items List
window appears.
2
Click the zoom arrow (
) next to the item you want to build. The
Item Information
window appears.
3
Click the
Auto-Build
tab.
4
In the
Minimum Level for Restocking Alert
field, type the minimum level of the item you want to have in inventory.
5
Click
Edit List
. The
Auto-Build Information
window appears.
6
In the
List what it takes to build
field, type the number of item units that will be made using the components.
7
Enter the details of each of the components required to build the item.
a
Click in the
Item Number
column and press
tab
. Your items list appears.
b
Select a component item required to build the new finished item and then click
Use Item
. The details of the component appear in the
Item Number
and
Name
columns.
c
In the
Quantity
column, type the number of component items required to build the specified quantity of the finished item.
d
Repeat from
step a
for each component required to build the new finished item.
8
When you have entered all the components, click
OK
.
9
Click
OK
and then click
Close
to return to the
Inventory
command centre.
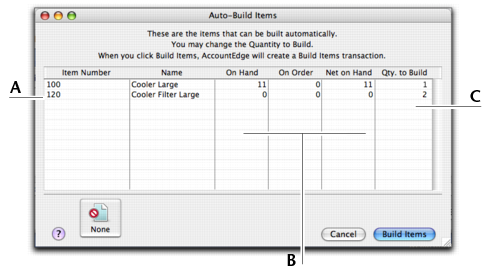
To auto-build an item
1
Go to the
Inventory
command centre and click
Auto-Build Items
.
The
Auto-Build Items
window appears.
A
This column displays all items that you have designated as finished items.
B
The
On Hand
,
On Order
and
Net on Hand
columns show the current record of your finished items.
C
Type the quantity of finished items you want to build in the
Qty. to Build
column. (Click
None
if you want to change all numbers in this column to zero.)
2
Click
Build Items
to begin transferring component items to finished items. The
Build Items
window displays the details of the transfer that will occur when the finished item is built.
3
Review the entries in this window to make sure that the quantity, unit cost and total inventory values are correct. Note that the quantities of the components in the list appear as negative numbers, while the quantities of the finished items in the list are shown as positive numbers.
4
Click
Record
to update your inventory quantities and values.
Related Topics
■
Creating items
■
Inventory locations
■
Auto-building items
Top of page