Index

Inventory > Building items > Auto-building items
For items that you repeatedly build, you can use the Auto‑Build function to build the finished items.
Before you can build a finished item using the Auto-Build function, you need to define what items are needed to build the item.
You can also auto-build items using the To Do List. In the Stock view of the To Do List, select the items you want to build and click Order/Build.
To define an Auto-Build item
1
Go to the Inventory command centre and click Items List. The Items List window appears.
3
Click the Auto-Build tab.
4
In the Minimum Level for Restocking Alert field, type the minimum level of the item you want to have in inventory.
5
Click Edit List. The Auto-Build Information window appears.
6
In the List what it takes to build field, type the number of item units you want to be made. If bulk quantities of materials are purchased to build an item, it may be easier to specify the materials required to build a greater quantity of the item, such as 10 or 20.
a
Click in the Item Number column and press tab. Your items list appears.
b
Select a component item required to build the new finished item and then click Use Item. The details of the component appear in the Item Number and Name columns.
c
In the Quantity column, type the number of component items required to build the specified quantity of the finished item.
d
Repeat from step a for each component required to build the new finished item.
8
When you have entered all the components, click OK. The Item Information window reappears.
9
Click OK and then click Close to return to the Inventory command centre.
To auto-build an item
1
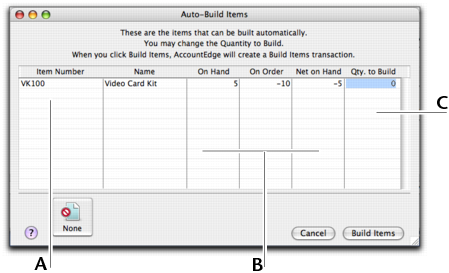
Go to the Inventory command centre and click Auto-Build Items. The Auto-Build Items window appears.
The On Hand, On Order and Net on Hand columns show the current record of your finished items.
Type the quantity of finished items you want to build in the Qty. to Build column. (Click None if you want to change all numbers in this column to zero.)
2
Click Build Items to begin transferring component items to finished items. The Build Items window displays the details of the transfer that will occur when the finished item is built.
3
Review the entries in this window to make sure that the quantities, unit costs, and total inventory values are correct. Note that the quantities of the components in the list appear as negative numbers, while the quantities of the finished items in the list are shown as positive numbers.
4
Click Record to update your inventory quantities and values.
Top of page