Direct Deposit and Electronic Vendor Payments
You can now pay your employees and your vendors electroncially using the AccountEdge software. By subscribing to the Direct Deposit service through our partner Forte Payment Systems, you will be able to enter employee and vendor bank account details and pay them electronically directly from within AccountEdge.
|
a
|
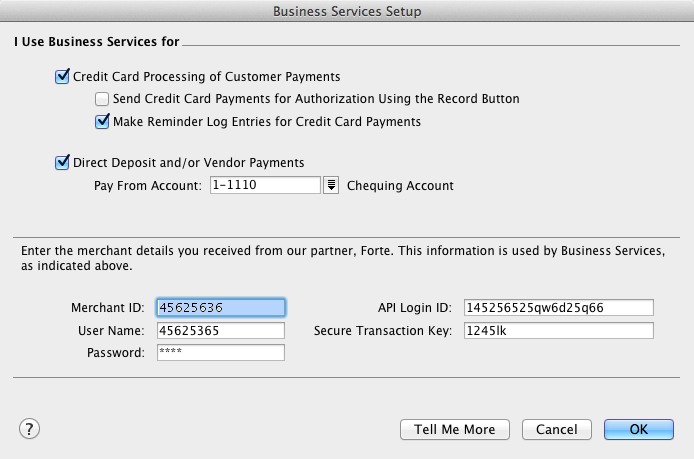
Go to the Setup menu and choose Electronic Payments. Select Set Up Electronic Payments & Deposits from the drop down menu. The Business Services Setup window appears.
 |
|
b
|
|
c
|
Select the account from which electronic payments are to be withdrawn in the Pay From Account field. This account will become the default in the Prepare Electronic Payments window.
|
|
2
|
Enter the Merchant ID, User Name, and password information you received when you subscribed to Business Services.
|
|
3
|
Click OK.
|
You need to record your bank identification information for the checking account you specified in the Business Services Setup window. This is required for routing payments across the electronic payments network.
note : Entering bank account details in the Accounts Easy Setup Assistant
If you entered banking details for your accounts in the Set up the Accounts List to meet your business needs window of the Accounts Easy Setup Assistant, you can ignore this procedure.
|
1
|
|
2
|
Select the bank account you will use for electronic payments. Click Edit. The Edit Accounts window appears.
|
|
3
|
Click the Banking tab.
|
|
4
|
Enter your bank account details. Copy this information as it appears on your bank statement or chequebook.
|
|
5
|
When you record a transaction you want to pay electronically, you need to post the transaction to a temporary holding account until you create the electronic payment file. This holding account is called a clearing account.
Check your accounts list for an account named ‘Electronic Clearing Account.’ If it doesn’t exist, you need to create it. Note that the clearing account must be a banking account, that is, an account with a Bank or Credit Card type.
Before you can post transactions to the electronic clearing account, you need to make this account the linked (default) account for electronic payments.
|
1
|
Go to the Setup menu, choose Linked Accounts and then Accounts & Banking Accounts. The Accounts & Banking Linked Accounts window appears.
|
|
2
|
In the Bank Account for Electronic Payments field, type or select the Electronic Clearing Account.
|
|
3
|
Click OK.
|
note : Entering employee bank details in the Payroll Easy Setup Assistant
If you entered banking details for your employees in the Build your employee list window of the Payroll Easy Setup Assistant, you can ignore this procedure.
|
1
|
|
2
|
|
3
|
Click the Payment Details tab.
|
|
4
|
|
6
|
|
7
|


