To upgrade your current data file for use with MYOB Accounting Plus Version 10

Your Accounting Plus software includes a program, called the Upgrade Wizard, that automatically upgrades your data file so it can be used by Accounting Plus. Follow these steps to use the Upgrade Wizard to upgrade your data file.

  1. Locate the Upgrade Wizard.

The Upgrade Wizard appears as an icon named MYOB Accounting Plus Upgrade Wizard within the MYOB Accounting Plus folder that appears in the Programs folder on your Start menu, as seen in the following illustration:

After you locate this icon, select it to start the Upgrade Wizard.

  1. The first window of the Upgrade Wizard appears; this window introduces the Upgrade Wizard. Read the text in the window, then click Next to continue to the next step.
  2. The next step in the Upgrade Wizard, titled Find File to Upgrade, appears. In this step, you’ll perform two tasks.
  1. Choose the data file you wish to upgrade In the field at the top of the Find File to Upgrade step, shown in the following illustration, choose the location and name of the data file you want to upgrade.

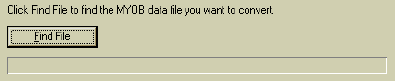
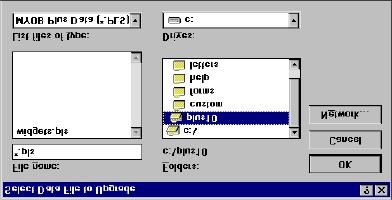
To choose your data file, click the Find File button; the Select Data File to Upgrade window will appear. The Select Data File to Upgrade window is a standard “find file” dialog box; browse through the window to find the data file you want to upgrade in its current location -- before it’s been upgraded.


Note: If you can’t find your data file If you’re using your MYOB software on a single computer or if you followed the instructions in the previous section (To prepare to upgrade your current data file for use on your peer-to-peer network), the data file should be located somewhere on the workstation you’re using. If you’re upgrading from Accounting Plus Version 8 or 9, your data file should have the extension .PLS If you’re upgrading from another MYOB product, the data file may have a .DAT or .PRM extension.

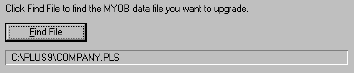
After you select your data file, it will be displayed below the Find File button. Here’s how the Find File to Upgrade window will look when you’ve selected the file you want to upgrade. (the actual location will vary, depending upon your data file’s name and location):

  1. Choose the upgraded data file’s new location and name In the field at the bottom of the Find File to Upgrade step, shown below, the name and location of the data file after it’s been upgraded should be displayed.

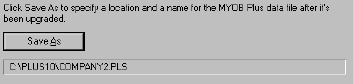
If you want to change the name and location that was automatically displayed, click the Save As button; a window will appear, allowing you to enter a new name for your data file and choose the location where you want the data file to be located when the upgrade process is complete.

We recommend that you choose a name for the data file that’s different than the current name of the data file. By doing this, it will be easier for you to find the correct data file when you want to open it later using Accounting Plus.

The Find File to Upgrade window will look something like this when you’ve specified the upgraded data file’s new location and name:


Warning: Two VERY important points about this step

The choices you make here are extremely important. Please consider the following points before you choose a name and location for the upgraded data file:

-- When you enter a name for the new file, use the three-character extension .PLS, not .DAT or .PRM, for name. If you’ve used MYOB Accounting or MYOB Premier in the past, be sure to remember that .PLS is now the three-character extension for your data file’s name.

-- Keep in mind that all your MYOB Accounting Plus workstations must have access to the location you specify here. When you choose a location, be sure you’re choosing a location that all workstations can access.

  1. After you’ve made your entries in the Find File to Upgrade step, click Next to continue to the next step.
  2. In the next step of the Upgrade Wizard, titled Confirm, you can double-check that the entries you made in the previous step are correct. If the entries aren’t correct, click the Back button to return to the Find File to Upgrade window to change your entries.

Once you’re certain the entries you’ve made are correct, click Next to begin upgrading your data file.


Note: Upgrading may take awhile
The amount of time needed to upgrade a data file for use with Accounting Plus depends upon the size of the file and the capabilities of the workstation you’re using. If you have a very large data file and a slower computer with little memory, be prepared for the upgrade process to take some time.
  1. When your data file is upgraded, the last window in the Upgrade Wizard will appear. At this point, you can do one of two things:

If you have additional data files to upgrade Click Next. The Find File to Upgrade window of the Upgrade Wizard will appear again. Follow steps 3 through 5 in these instructions for each data file until you’ve upgraded all your data files.

If you’ve finished upgrading data files Click Finish to exit the Upgrade Wizard.

When you’re finished using the Upgrade Wizard, you may need to register your Accounting Plus product, and, if you use Accounting Plus’s payroll features, you’ll also need to load the most recent payroll tax tables. The next steps describe these tasks.

  1. Your next steps depend upon whether you use Accounting Plus’s payroll features.

If you don’t use Accounting Plus’s payroll features Skip to step 11.

If you use Accounting Plus’s payroll features You’ll need to load the latest payroll tax tables to ensure your upgraded data file is using the proper payroll tax information. To do this, follow steps 8 through 10.

  1. Start Accounting Plus and open the data file you’ve just upgraded. The Accounting Plus Command Center window will appear.
  2. From the Setup menu at the top of your computer screen, choose Load Payroll Tax Tables.
  3. Follow the instructions that appear on your computer screen. When you’ve finished loading your payroll tax tables, close the data file and go on to step 11. (Note: If you’ve upgraded multiple data files, repeat steps 9 and 10 for each file.)
  4. We recommend that you now use the Optimization Wizard and the Verify Data File utility to ensure that your data file is in “healthy” working condition before you begin making your day-to-day accounting entries using Accounting Plus.

Note: Optimizing and verifying may take awhile
The amount of time needed to optimize and verify a data file for use with Accounting Plus depends upon the size of the file and the capabilities of the workstation you’re using. If you have a very large data file and a slower computer with little memory, be prepared for optimization and verification to take some time.

When you installed Accounting Plus, the Optimization Wizard also was installed. Locate the Optimization Wizard icon:

The Optimization Wizard appears as an icon named Optimization Wizard within the MYOB Accounting Plus folder that appears in the Programs folder on your Start menu. After you locate this icon, select it to start the Optimization Wizard.

After optimization is complete, open your data file and choose Verify Data File from the File menu within Accounting Plus.

For more information on optimization and verification, see To optimize a data file and To verify your data file.

  1. Congratulations! The upgrade process is complete!

To upgrade your current data file for use with MYOB Accounting Plus