Paying your employees > RTI Full Payment Submission
Welcome New Features
Departmental Accounting Escrows & Trusts Use Default Forms to Email Invoices/POs Item Variations Combine Items Student Loan Calculations Earlier Year Update Assistant Full Payment Submission changes Employer Payment Summary changes Employment Allowance Job Profit & Loss report enhancements Department reports Earlier Year Update report Item Record ID added AccountEdge Cloud
Introduction
Learning about your software
Manuals Online help Other resources
Where to start
Experiment with a sample company’s data
Exploring your software
Command centres Sidebar Favourites list Calendar (date entry) Business calendar Calculator Zoom arrows Search icons Select columns Mouse shortcuts Shortcut keys Default fonts
Setting up your company file
Overview Create a company file Set up accounts
Setting up accounts
Enter account opening balances Set up preferences Set a password for the Administrator user ID
Advanced setup
Overview Set up sales Set up purchases Set up payroll Do an initial bank reconciliation
Task 1: Identify uncleared withdrawals and deposits Task 2: Record uncleared withdrawals and deposits Task 3: Reconcile
Create item records Enter stock opening balances Set up a Web Store Manage Mobile Application Manage AccountEdge Cloud
Banking
Receiving money Preparing a bank deposit Spending money Entering transactions in the Bank Register window Transferring money between accounts Tracking petty cash expenses Reconciling your bank accounts
Undoing an account reconciliation
Importing statements Recording miscellaneous transactions Credit card transactions Analysing your cash flow
Sales
Creating a customer card Entering sales
Task 1: Enter information about the customer Task 2: Choose the type of sale Task 3: Enter the items or services you are selling Task 4: Enter additional information about the sale Task 5: Complete the sale Adding and deleting transaction lines, subtotals and headers in sales transactions
Recording sales with insufficient on-hand item quantities
Allow negative on-hand quantities and values Build, buy or backorder items
Changing the status of a sale Reviewing your sales information Receiving payments Printing payment receipts Credit control
Credit limits Credit holds Finance charges paid by customers
Creating customer credits
Settling credit notes
Dealing with a supplier who is also a customer Accounting for bad debts Progress Billing Manage Escrows & Trusts
Purchases
Creating a supplier card Entering purchases
Entering a purchase transaction Task 1: Enter information about the supplier Task 2: Choose the type of purchase Task 3: Enter the items or services you are purchasing Task 4: Enter additional information about the purchase Task 5: Complete the purchase Adding lines, subtotals and headers to purchases
Receiving items without a supplier invoice
Setting up an accrual account for items received without a supplier invoice Recording items received without a supplier invoice
Creating a purchase order from a sale Changing the status of a purchase Reviewing your purchase information Paying suppliers Creating supplier debits
Settling supplier debits
Adding finance charges paid to suppliers
Paying your employees Billing for time
About the time billing feature Setting time billing preferences Setting billing rates Creating activities Creating activity slips
Creating multiple activity slips
Reviewing and changing activity slips Creating time billing invoices Work in progress Billing Rate Levels
Stock
Creating items
Average Cost, Last Cost and Standard Cost
Creating Item Variations Making stock adjustments
Stock adjustment examples
Multiple stock locations
Recording stock movements between locations
Building items
Auto-building items
Count stock Reviewing your stock information Setting item prices Customising stock
Creating custom price levels Creating custom lists Custom lists and stock reports Creating brands list Brands list and stock reports Weight Creating custom fields Creating tags list Tag list and inventory reports
International transactions
About the multiple-currency feature Setting up multiple currencies
Task 1: Select the multiple currency option Task 2: Set up records for foreign currencies Task 3: Create accounts to track foreign-currency transactions Task 4: Assign accounts to foreign currencies Task 5: Assign appropriate currencies to foreign customers and suppliers
Exchange rates Tracking currency gains and losses
Tracking realised currency gains and losses Unrealised currency gains and losses
Miscellaneous transactions
Transferring funds to a foreign account Entering foreign-currency transactions in a local account Reconciling accounts containing foreign transactions
Reporting VAT
Setting up VAT codes VAT reports
Accrual and cash reporting VAT Summary and VAT Summary – Cash reports VAT Detail, VAT Detail – Cash reports VAT Return and VAT Return – Cash reports
EC sales
Reporting EC sales
EC purchases
Reporting EC purchases VAT Return, VAT Return – Cash reports
Lists
Adding a record
Adding records using Easy-Add
Finding a record Changing a record Inactivating or reactivating a record Deleting a record Combining records
Combining Cards Combining accounts Combining items
Tracking Mileage
Company vehicles list Mileage Rates Mileage Slips
Document Manager
Reports
Producing reports Printing report batches Customising reports
Task 1: Select the data to be printed Task 2: Specify the required fields Task 3: Select finishing options Task 4: Change the report format Task 5: Print the report Task 6: Save the report Changing the default fonts on reports
Transactions
Finding a transaction Changing or deleting a transaction
Changing a transaction Deleting a transaction
Reversing a transaction Recurring transactions
Setting up recurring transactions Recording recurring transactions Responding to reminders for recurring transactions
Publishing to iCal
Publishing an invoice or purchase to iCal Publishing a recurring transaction to iCal Publishing a reminder log to iCal
Forms
Finding forms Sending forms
Sending forms immediately Sending forms in a batch Advanced filters
Customising forms
Task 1: Display the form Task 2: Set up form properties Task 3: Adding and editing elements Task 4: Preview the customised form Task 5: Save the customised form Task 6: Print the customised form Changing the default fonts on forms
Adding and editing elements
Adding and editing data and label elements Adding and editing graphic elements Editing all elements with common commands
Contact management
Creating a card Keeping in touch with your contacts
Personalised letters Mailing labels Reminder log More ways to keep in touch
Grouping your contacts
Identifiers Custom lists
Synchronising cards with Mac Address Book cards
Deleting cards Resetting the synchronisation
Customising cards
Card identification codes Card pictures
Reviewing your contact information
Financial control
Tracking financial information
Accounts Categories Jobs Departments
Tracking reimbursable expenses
Task 1: Set up a job Task 2: Assign expenses to the job Task 3: Bill the customer Changing the status of a reimbursable expense
Budgets
Entering budget amounts Budget Shortcuts window
Auditing your records
Company Data Auditor Audit trail tracking system
Reviewing financial information
End-of-period procedures
Month-end procedures
Task 1: Run the Company Data Auditor Task 2: Review reports Task 3: Send customer statements Task 4: Record depreciation Task 5: Lodge VAT returns Task 6: Pay PAYE and NIC that is due Task 7: Lock periods
Starting a new financial year
Task 1: Complete month-end tasks Task 2: Perform a stocktake Task 3: Provide information to your accountant Task 4: Enter end-of-year adjustments Task 5: Back up your company file Task 6: Start a new financial year Task 7: Optimise and verify your company file
Starting a new payroll year
Task 1: Process the last paycheques for the year Task 2: Print payroll reports Task 3: Prepare and submit payroll tax forms Task 4: Back up your company file Task 5: Start a new payroll year Task 6: Optimise and verify your company file
Managing user accounts and company files
Managing user accounts Backing up and restoring company files Servicing your company file
Checking your company file for errors Optimising your company file Purging information that is no longer needed Troubleshooting file-locking problems Alert messages—company file Alert messages—transactions
Importing and exporting data
Exporting data Importing data Managing import and export records AppleScripts
Networking company files
Preparing company files for multiple users Setting up the network hardware Setting up a company file folder on a Mac OS X host Accessing the shared company file from Mac OS X workstations
Glossary Index
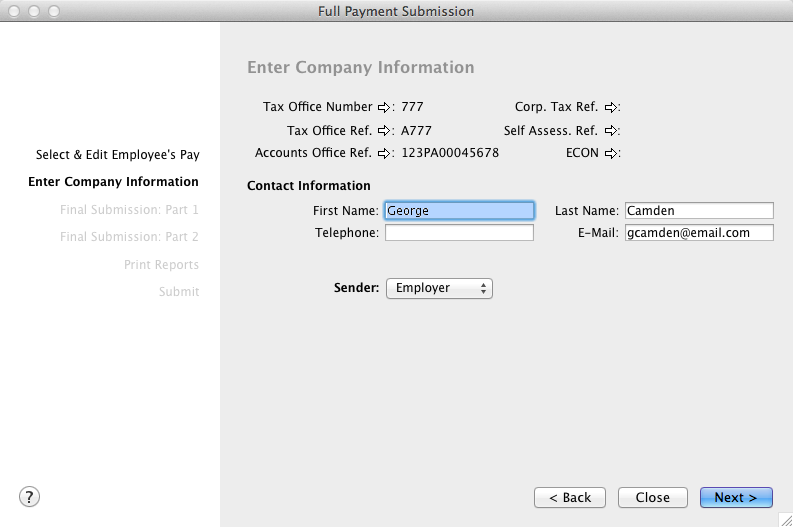
Each time you record pays for your employees, you must submit a Full Payment Submission (FPS) to HMRC immediately following the processing of each pay.
The Full Payment Submission is only available for the 2014 payroll year or later. This feature is available for employers to submit their payroll data as an EXML file to HMRC.
[2015 payroll only] If an employee leaves his employment after the FPS has been submitted, their leaving date can be reported in the next FPS submission.
To process a full payment submission

Click to show more information

Top of page