Once you have created payroll categories (see Creating payroll categories) and an employee card (see Creating employee cards), you can enter the employee’s payroll information.
If you want to prevent a user from editing and viewing all payroll details, you need to restrict access to payroll reports as well as to employee card information and to the Payroll command centre functions. You can set these restrictions in the access profile of each user ID. For more information, see ‘Managing user accounts’.
|
1
|
|
2
|
Click the Employee tab and select an employee.
|
|
3
|
|
4
|
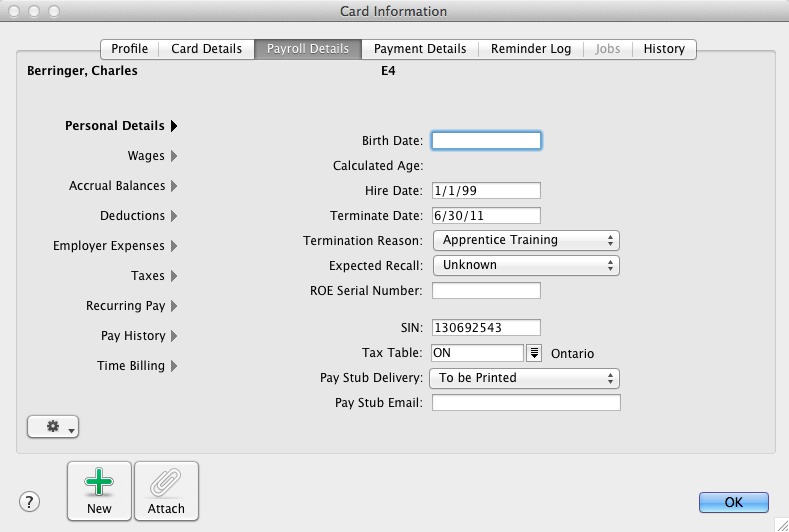
Click the Payroll Details tab.
|
|
6
|
If you email pay stubs, enter the employee’s email address in the Pay Stub Email field.
|
1
|
|
2
|
Select the employee you are preparing an ROE form and click Edit. The Card Information window appears.
 |
|
■
|
Termination Reason - Select the reason for termination from the list provided.
|
|
■
|
Expected Recall - Specify if or when the employee is expected to return. If Date of Recall is selected, enter the expected date in field provided.
|
|
■
|
ROE Serial Number - Enter the ROE Serial Number issued from previously filed ROE. This field can be used if it is necessary to amend a previously submitted ROE.
|
|
4
|
|
5
|
Click Close.
|
|
6
|
Click Wages and enter the wage information for this employee.
|
When you select a pay basis, the corresponding payroll category for paying wage amounts is automatically selected in the Wage list. If you select Hourly, the Base Hourly wage category (or the name you assigned to this category) is selected. If you select Salary, the Base Salary wage category (or the name you assigned to this category) is selected.
|
c
|
Select the employee’s pay frequency in the Pay Frequency field.
|
|
d
|
In the Hours in [...] Pay Period field, type the number of hours in the employee’s normal pay period.
|
|
e
|
If the employee’s wage expense account is different from the default account, in the Wages Expense Account field, type or select the required account.
|
|
f
|
If the employee receives commissions, select the Linked Commissions Category from the drop down list.
|
|
7
|
Click Accrual Balances and click in the select column () next to each accrual that applies to the employee.
|
|
8
|
Click Deductions and click in the select column () next to each deduction that applies to the employee.
|
|
9
|
Click Employer Expenses and click in the select column () next to each expense that applies to the employee.
|
|
10
|
Click Taxes and enter the employee’s payroll details.
|
|
b
|
Select Use Basic Personal Amount for Net Claim to apply the basic exemption for either the Federal TD-1, the Provincial TD-1 or the TP-1015 3-V for the Quebec tax table. Note: for Quebec tax table, the Basic Personal Amount for Line 10 appears and entering an amount in Line 19 is optional.
|
|
11
|
|
a
|
If necessary, change the employee’s default pay details by overriding the values that appear in the Hours or Amount column next to a payroll category.
|
If you use timesheets to record all hours worked by an employee, enter zero as the default hours for the Base Hourly payroll category.
The value of a payroll category with Calculated displayed in the Hours or Amount column is automatically calculated when you process a pay. Calculated values include tax amounts and accrual hours where hours are calculated as a percentage of the gross hours paid.
|
b
|
If you want to assign a job number to a payroll category for this employee, click in the Job column and enter or select a job number.
|
|
c
|
If you track fiscal information using categories, select a category from the Default Category list.
|
|
12
|
If you have already paid the employee in the current payroll year, click Pay History and type the amounts you have paid in the Activity column next to each relevant payroll category. You can enter pay history for specific months, quarters, or for the year to date.
|
Amounts entered in the Pay History window appear on reports not derived from payroll activity (such as register reports). They are not recorded as transactions in your accounts.
|
13
|
If you use the Time Billing function to track the time the employee spends to complete work for clients and customers, click Time Billing and type the employee’s time billing rate and cost per hour.
|
|
14
|
Click the Payment Details tab and select the method you use to pay the employee in the Payment Method list.
|
If you are paying employees using Direct Deposit, select Electronic and enter the employee’s bank details in the Account Type, EFT Transit Number, Bank Account Number and Bank Account Name fields. These fields are used to route electronic payments to the correct destination bank.
|
15
|
|
16
|


