|
■
|
Host the company file on the most powerful computer in the network Users on workstations will enjoy better performance if the company file is stored on the most powerful computer in your network—the fastest, with the most memory.
|
|
■
|
Host the company file on the key employee’s computer If one employee will use the company file more than anyone else, consider storing the company file on that employee’s computer. This person will experience better performance from accessing the company file directly, compared with accessing it across the network.
|
|
■
|
Host the company file on a backed-up computer If you store all your important files on a central host that is backed up frequently, it is a good idea to also store your company file on that host. The company file will then be backed up along with all your other vital data.
|
|
2
|
In Windows Explorer (Win7) Files Explorer (Win8), create a folder named Company_Files in a convenient location, for example, C:/Company_Files. This folder is where the shared company file will be stored.
|
|
3
|
Right-click the Company_Files folder and choose Share with, then select to share the folder with a homegroup or with specific people. The File Sharing window appears.
|
|
4
|
|
5
|
Click in the Permission Level column next to the user group to set the read and write permission for the user.
|
|
6
|
Select Read/Write to enable full control permission.
|
note : Everyone group
If the Everyone group does not appear in the list, select it from the menu field above the list and click Add, then assign access permission as per the above step.
|
7
|
|
8
|
In Windows Explorer, move the company file to the shared Company_Files folder you just created on the host.
|
|
2
|
In Windows Explorer, create a folder named Company_Files in a convenient location, for example, c:\Company_Files. This folder is where the shared company file will be stored.
|
|
3
|
|
4
|
Click in the Permission Level column next to the Everyone user group and choose Co-owner. This enables full control permission.
|
note : Everyone group
If the Everyone group does not appear in the list, select it from the menu field above the list and click Add, then assign access permission as per the above step.
|
5
|
|
6
|
In Windows Explorer, move the company file to the Company_Files folder you just created on the host.
|
|
2
|
In Windows Explorer, create a folder named Company_Files in a convenient location, for example, c:\Company_Files. This folder is where the shared company file will be stored.
|
|
3
|
|
4
|
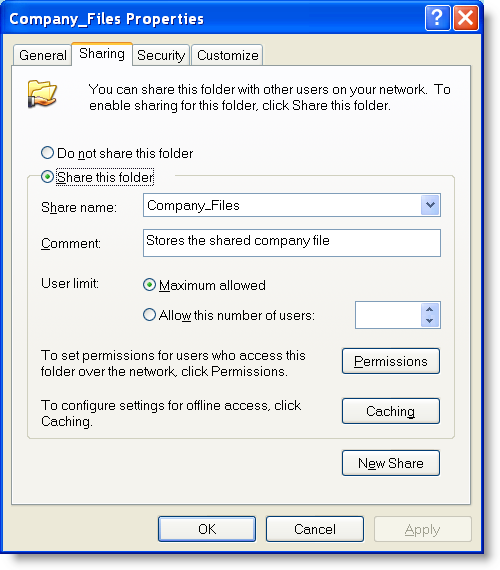
In the Company_Files Properties window, click the Sharing tab and set the fields and controls as shown below.
|
 |
|
|
Select this option. If your network does not have workgroups or you are logged in to a domain, select the Share this folder in the network option, and then complete the wizard that appears.
|
|
|
Type a description that users will be able to read in the folder’s Property window. This option is not present if your network does not have workgroups or you are logged in to a domain.
|
|
|
6
|
Click Permissions.
|
|
7
|
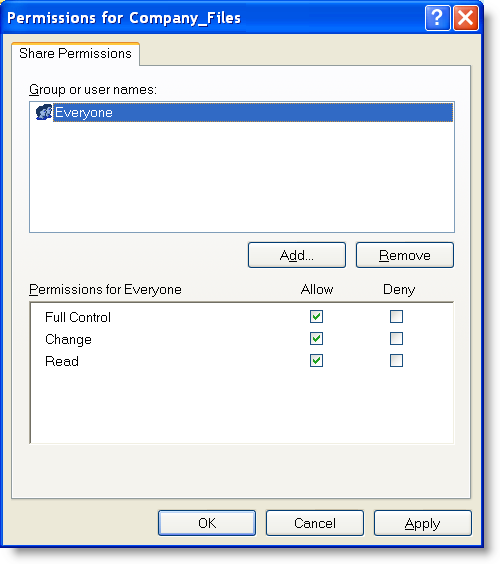
In the Permissions for Company_Files window, click the Everyone user group, set the Allow and Deny checkboxes in the Permissions list as shown below and click OK.
|
 |
||
|
8
|
|
9
|
In Windows Explorer, move the company file from its present location to the Company_Files folder on the host.
|